Feb 11, 2026
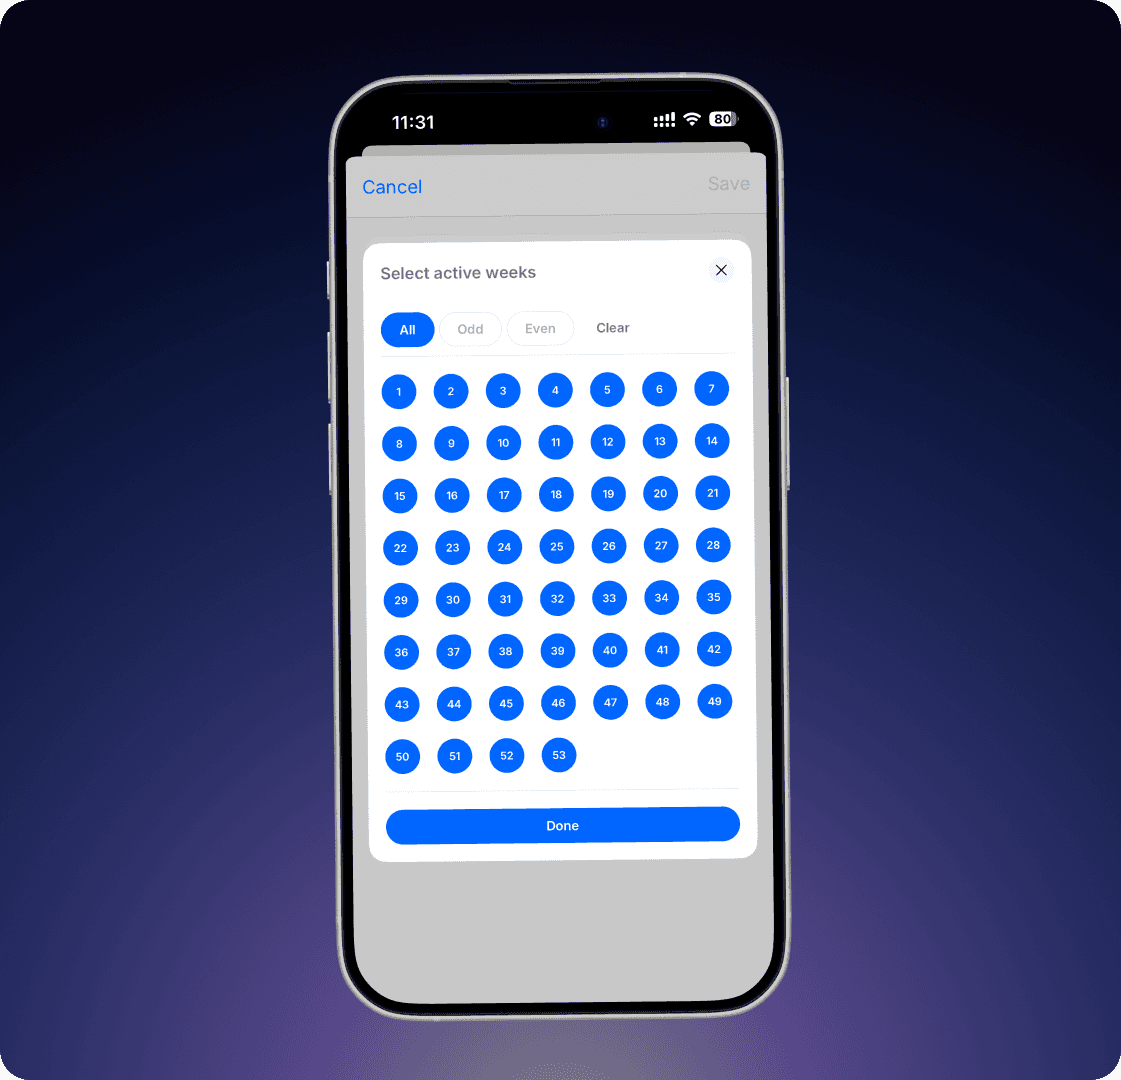
More Flexible Scheduling for Weekly Routines
Weekly routines can now be adapted to match the reality of your operations. Instead of running every week, you can choose exactly which weeks a routine should be active — for example, even or odd weeks, or only during a specific period of the year. This makes it easier to manage seasonal routines and recurring tasks that don’t follow a strict weekly pattern.
Learn more
Recurring Checklist That Needs to Be Done Regularly
Recurring Checklist That Needs to Be Done Regularly
⚠️ To make changes to Workflows, you need “Operations Manager” or “Superadmin” permissions.
1. Select the relevant team.
2. Click on ⚙️ in the top-right corner and choose Edit Team Schedule.
3. Select the frequency fits your needs and click +.
4. Provide a title for the checklist, set the scheduling details, and select Checklist as the type.
5. Add the checkpoints that should be included.
6. You can also create sections, add descriptions, and include images to make the checklist clear and organized.
⚠️ För att göra ändringar i Körschemat behöver du ha behörigheten “Driftansvarig” eller “Superadmin”.
Välj först den ansvariga avdelningen. Klicka på ⚙️ i det övre högra hörnet och välj Körschema. Välj den typ av rutin som passar och klicka på +. Ge checklistan en titel, vilken schemaläggning den ska ha och välj Checklista. Skriv in de kontrollpunkter som ska vara med. Det går att skapa sektioner, lägga till beskrivning och bild.
Recurring tasks that need to be done regularly
⚠️ To make changes to Workflows, you need “Operations Manager” or “Superadmin” permissions.
1. Select the relevant team.
2. Click on ⚙️ in the top-right corner and choose Edit Team Schedule.
3. Select the frequency that fits your needs and click +.
4. Provide a title for the task, set the scheduling details, and specify whether a checkmark is required when the task is completed.
5. You can also add an image, a description, or attach a quick reference guide.
⚠️ För att göra ändringar i Körschemat behöver du ha behörigheten “Driftansvarig” eller “Superadmin”.
Välj först den ansvariga avdelningen. Klicka på ⚙️ i det övre högra hörnet och välj Körschema. Välj den typ av rutin som passar och klicka på +. Ge uppgiften en titel, vilken schemaläggning den ska ha och om det ska krävas en bock när uppgiften är utförd. Det går också bra att lägga till bild, beskrivning eller bifoga en lathund.
Feb 11, 2026
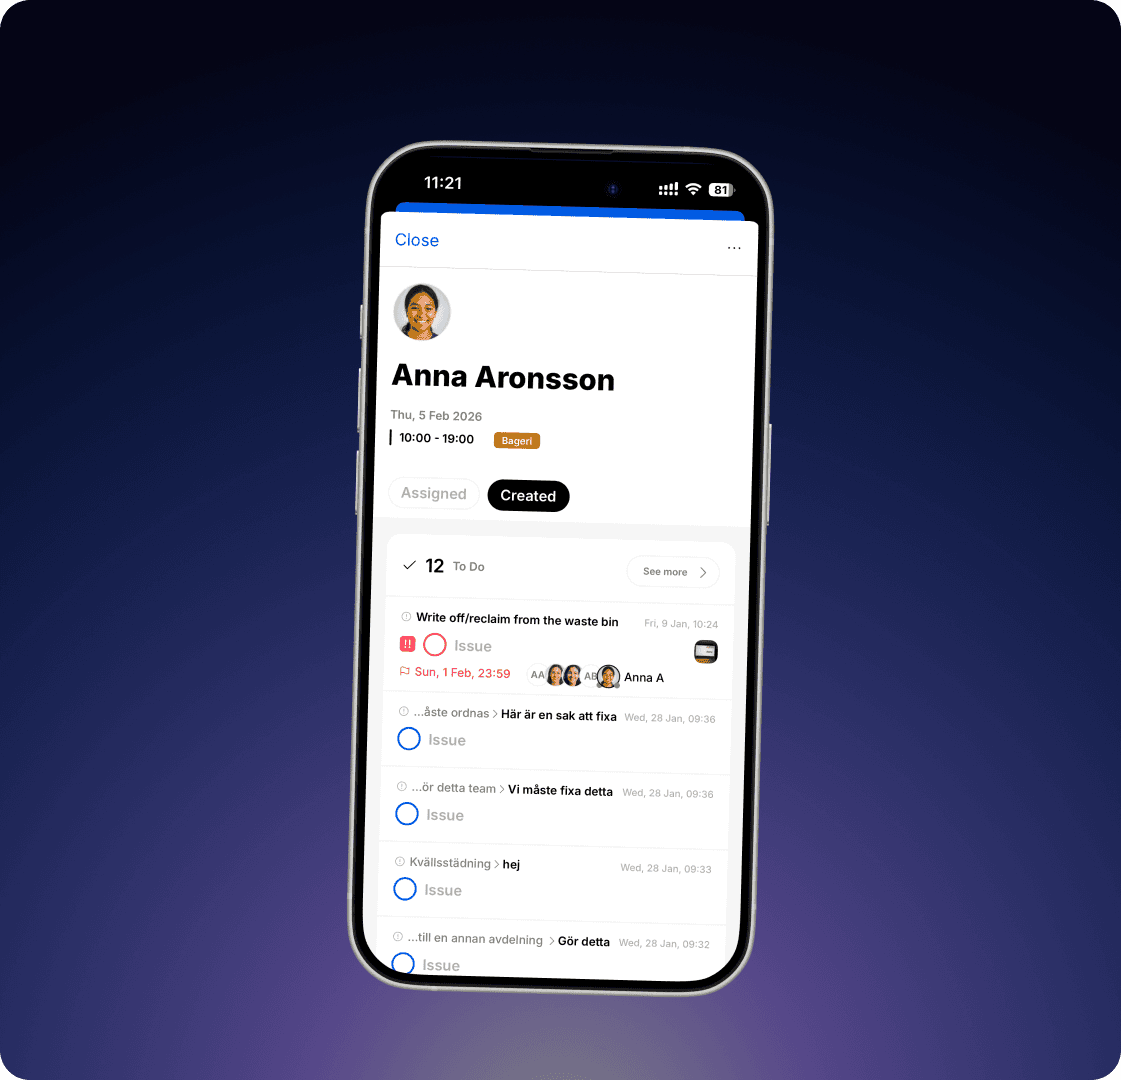
Your Created ToDos – All on My Page
You can now keep track of both ToDos assigned to you and ToDos you’ve created yourself. This makes follow-up easier, as you can quickly see what’s completed and what needs more attention — all gathered on My Page.
Learn more
My Page – your personal view in StoreSprint
With My Page, you get a personal overview where everything assigned to you is gathered in one place. Especially useful for members who work across different teams and need a simple way to stay informed.
Key advantages:
See which shifts you are scheduled for during the day.
See which tasks from the team schedule you been assigned to.
See which other tasks and errands you've been assigned to.
See which tasks you have created
A smarter way to stay organized!

⚠️ To be able to view scheduled shifts, an active HR integration is required.
Med Min sida får du en personlig översikt där allt som är tilldelat till just dig samlat på ett och samma ställe. Särkilt användbart för dig som arbetar över flera avdelningar och behöver en snabb överblick över dagens ansvar!
Fördelar:
Se vilka pass du är schemalagd på under dagen.
Se vilka uppgifter från körschemat som du ansvarar över.
Se vilka övriga uppgifter, avvikelser och ärenden som du blivit tilldelad.
Se vilka uppgifter som du själv har skapat
Ett enklare sätt att hålla koll på din dag!
⚠️ För att kunna se schemalagda pass behöver det finnas en aktiv HR-integration
Create a To-do
To create a “To-Do,” click the plus icon in the bottom-right corner of any team. Enhance clarity by including the following details:
Title and Description
• Title: Clearly explain what needs to be done. The title is displayed everywhere, including on Storecast.
• Description: Use the description for additional details, accessible by clicking into the item.
Images
• Attach images to clarify what needs to be done or how it should be done.
• Use the camera on your mobile device or upload images from your photo library.
Assigned Person
• Assign the task to a responsible person by selecting active user accounts or entering free text.
• If an active user account is selected, a push notification is sent to the assigned individual.
Priority and Deadline
• Priority: Use priority settings to indicate what should be handled first. Choose from Low, Normal, High, or Urgent. Tasks with higher priority levels appear higher in the list.
• Deadline: Add a deadline for when the task should be completed. Tasks within the same priority level are sorted chronologically by deadline.
Tip 🔔
To modify the tags available for To-Dos, navigate to ⚙️ → Admin → To-Do.
Klicka på plusset nere i högra hörnet på valfri avdelning för att skapa en "Att göra".
Var extra tydlig genom att lägga till nedan detaljer:
Titel och beskrivning
Använd titel och beskrivning för att förklara vad som ska göras. Titel visas överallt inklusive på Storecast, medan beskrivning finns tillgängligt om du klickar dig in på punkten.
Bilder
För att göra det extra tydligt vad som ska göras eller hur något ska göras, så kan du bifoga bilder på din uppgift. Du kan fota med kameran på din mobila enheter, eller ladda upp bilder från ditt bildbibliotek.
Ansvarig person
Du kan tilldela ansvarig person på uppgiften, antingen genom att välja aktiva användarkonton, eller skriva med fritext. Om du väljer ett aktivt användarkonto skickas en push-notifikation ut till den som blivit markerad som ansvarig.
Prioritet och Deadline
För att sortera vad som bör göras först kan du använda Prio och Deadline. Om du klickar på Prio kan du välja Låg, Normal, Hög eller Akut som prioritetsnivåer. Uppgifter med högre prioritetsnivå sorteras högre upp i listan. Du kan även lägga till deadline för när uppgiften senast ska vara hanterad. Inom en prioritetsnivå sorteras uppgifter i kronologisk tidsordning.
Tips 🔔 Vill man ändra på taggar som går att lägga till under punkt så gör man det från ⚙️ → Admin → Att göra.
Dec 15, 2025
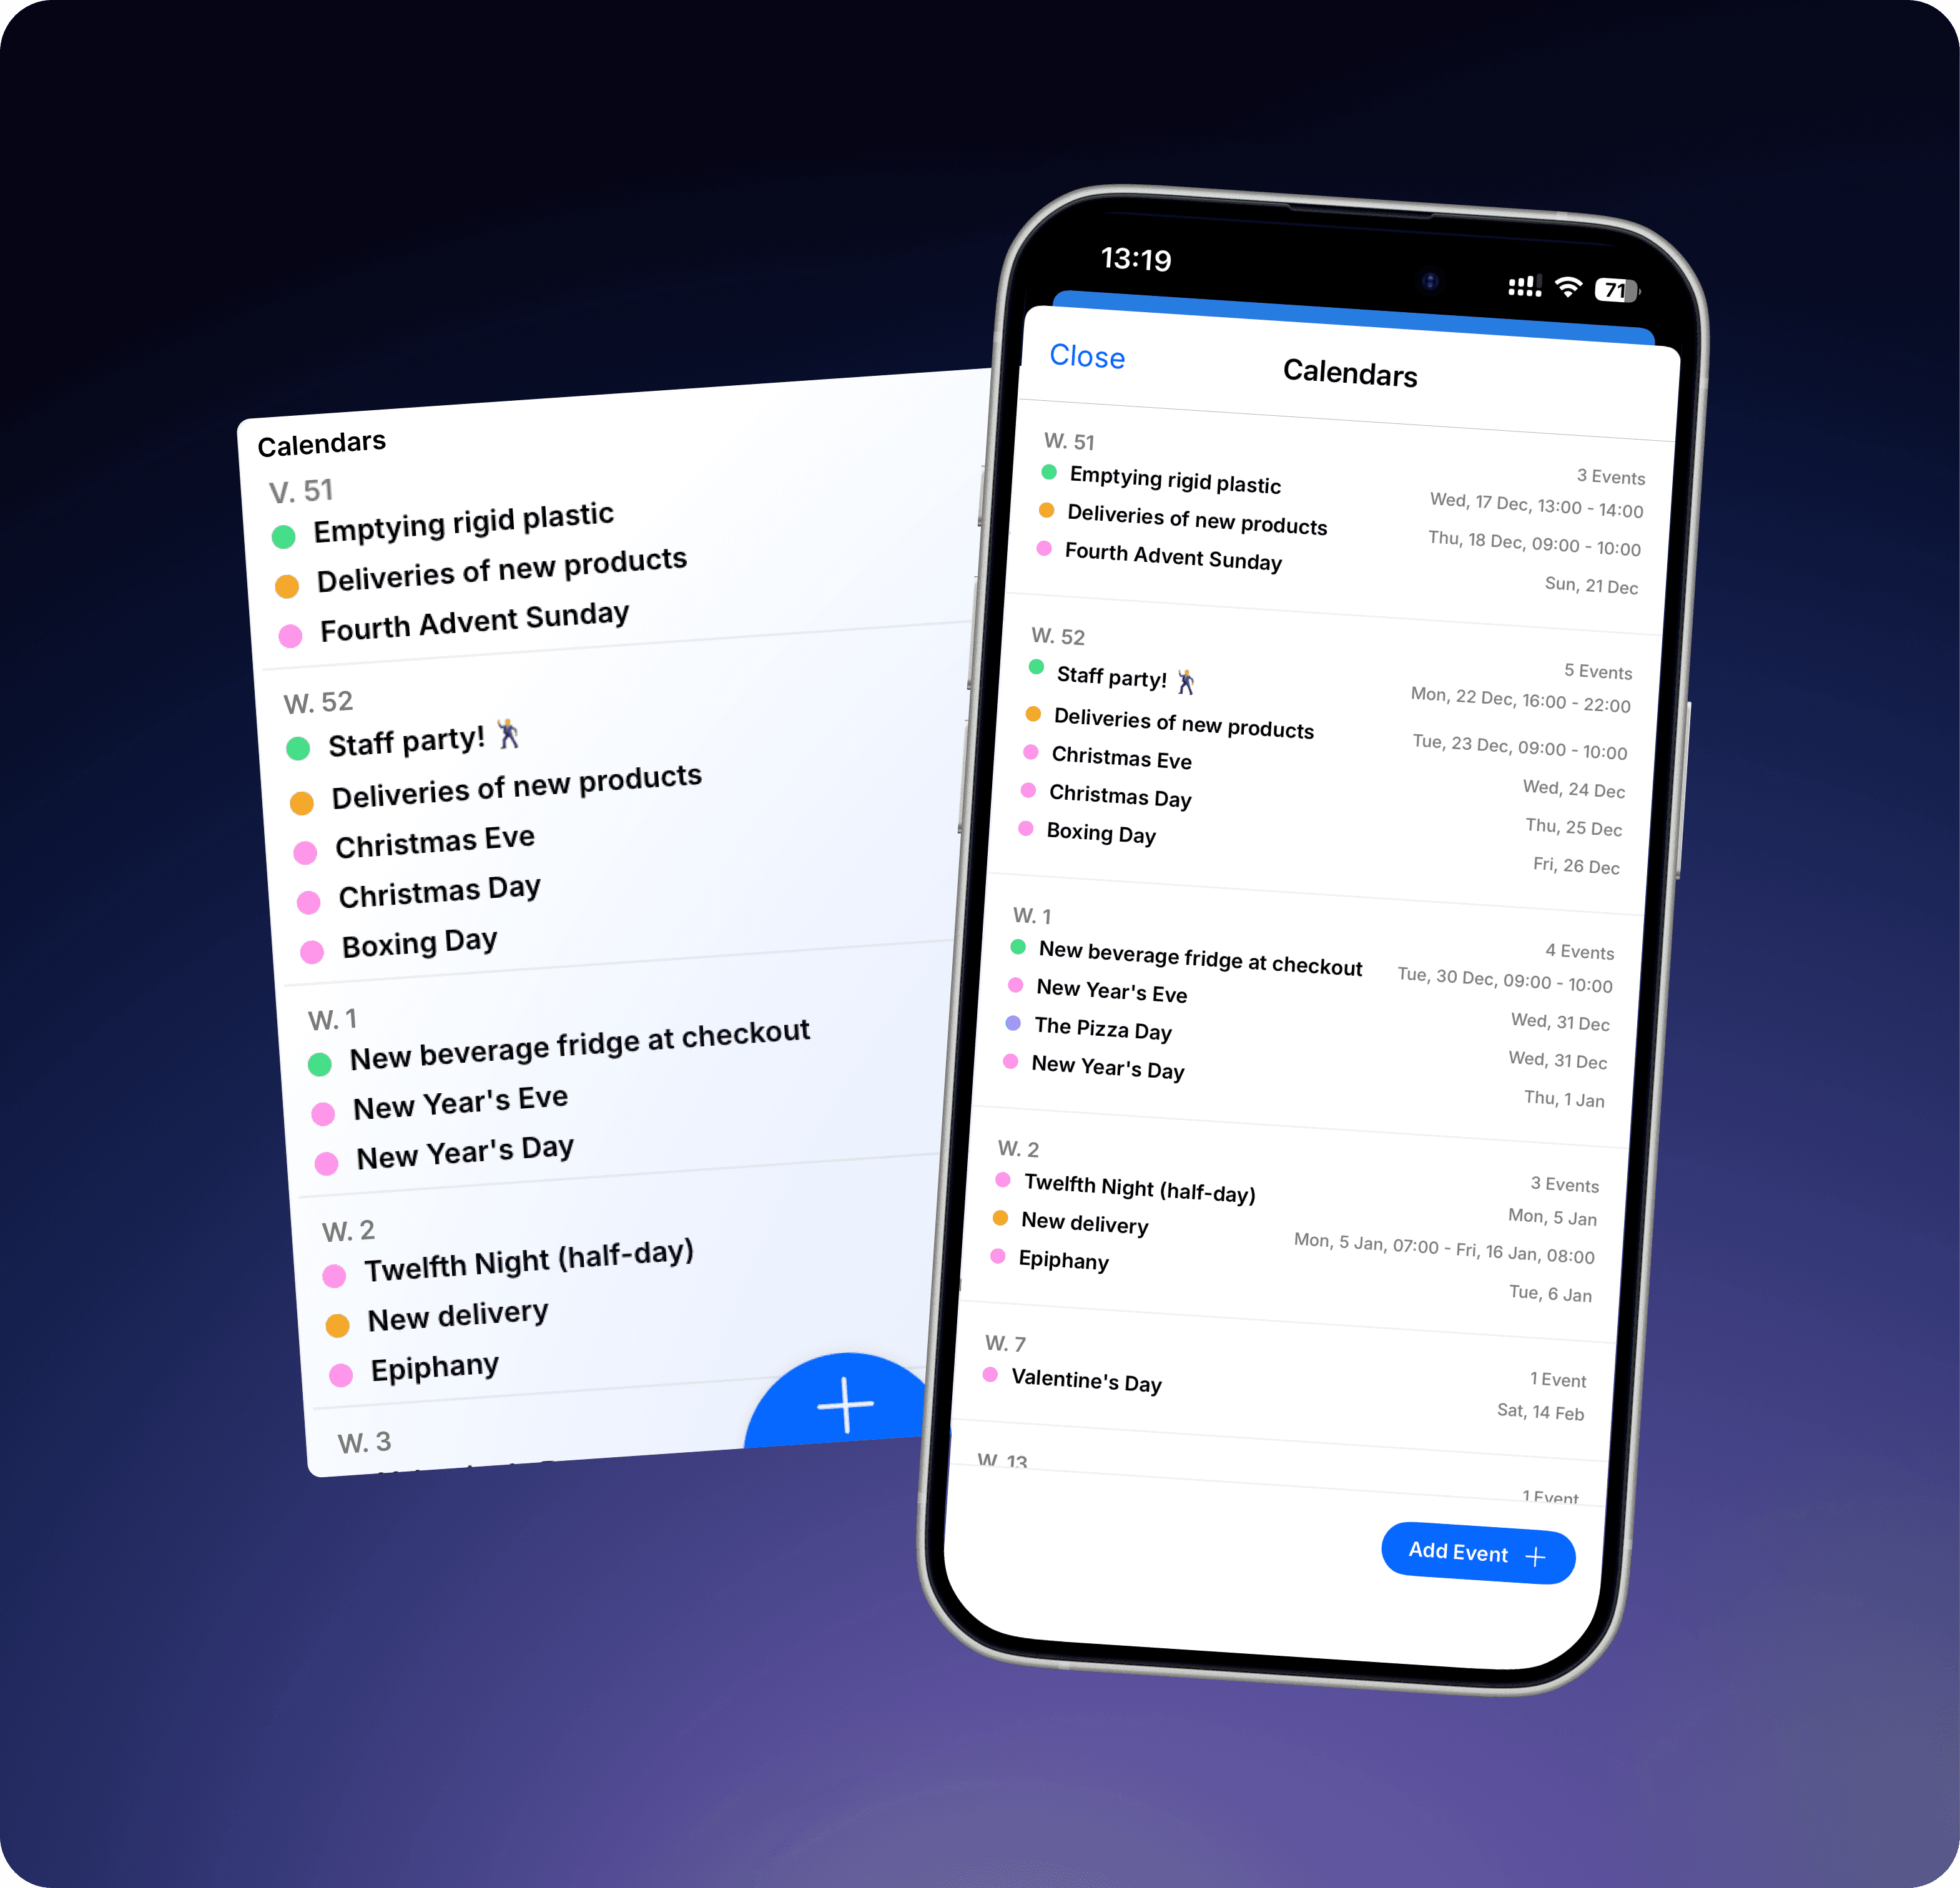
Events - New Calendar View
New beverage fridge, deliveries, holidays, food-themed days, or other things that impact the day?
Events give you a quick overview in a clear calendar view, making it easier to plan and work proactively. You’ll find it in the team's view and as a widget on the dashboard.
Learn more
Get started with calanders
Permission level required: Operations manager or Superadmin
Admin → Calendars → Create Calendar
Name the calendar, choose a color, and select which teams it should be in.
För att skapa en kalender krävs behörighetsgrad Driftansvarig eller Superadmin
Skapa en egen kalender för att lägga in egna aktiviteter och händelser som påverkar butiken.
Admin → Kalendrar → Lägg till kalender → här kan man välja att skapa kalender.
Namnge kalendern, välj en färg och vilka avdelningar kalender ska finnas på.
När en eller flera kalendrar är aktiva i StoreSprint så finns möjligheten att lägga till dom på tavlan .
Subscribe to calendar
Permission level required: Operations manager or Superadmin
Admin → Calendars → Subscribe to Calendar → Select the calendar you want to subscribe to and paste the iCal link into StoreSprint.
For Outlook calendars:
Go to Settings (gear icon in the top right corner)
Select “Calendar” in the left-hand menu
Go to “Shared Calendars”
Under “Publish a calendar”, choose the calendar you want to link and select “Can view all details”
Click on “Publish”
Click on “ICS” and copy the link
Paste the link here
Name the calendar, choose a color, and select which teams it should be in.
För att prenumerera på en kalender krävs behörighetsgrad driftansvarig eller Superadmin
Det går att prenumera på publika kalendrar eller en egen Google / Outlook-kalender. Händelserna synkas automatiskt in i StoreSprint.
Admin → Kalendrar → Lägg till kalender → här kan man välja att Prenumerera på extern kalender.
Välj en kalender som ni vill prenumerera på, klistra in iCal-länken i StoreSprint.
För Outlook-kalendrar:
Gå in på inställningar (kugghjulet upp i högra hörnet).
Välj "Kalender" i menyn till vänster.
"Delade kalendrar".
Under rubriken "Publicera en kalender" väljer ni vilken kalender som ska länkas och "Kan visa all information".
Tryck på "Publicera".
Tryck på “ICS” och kopiera.
Klistra in länken här.
Namnge, välj en färg och vilka avdelningar kalender ska finnas på.